Latest Updates
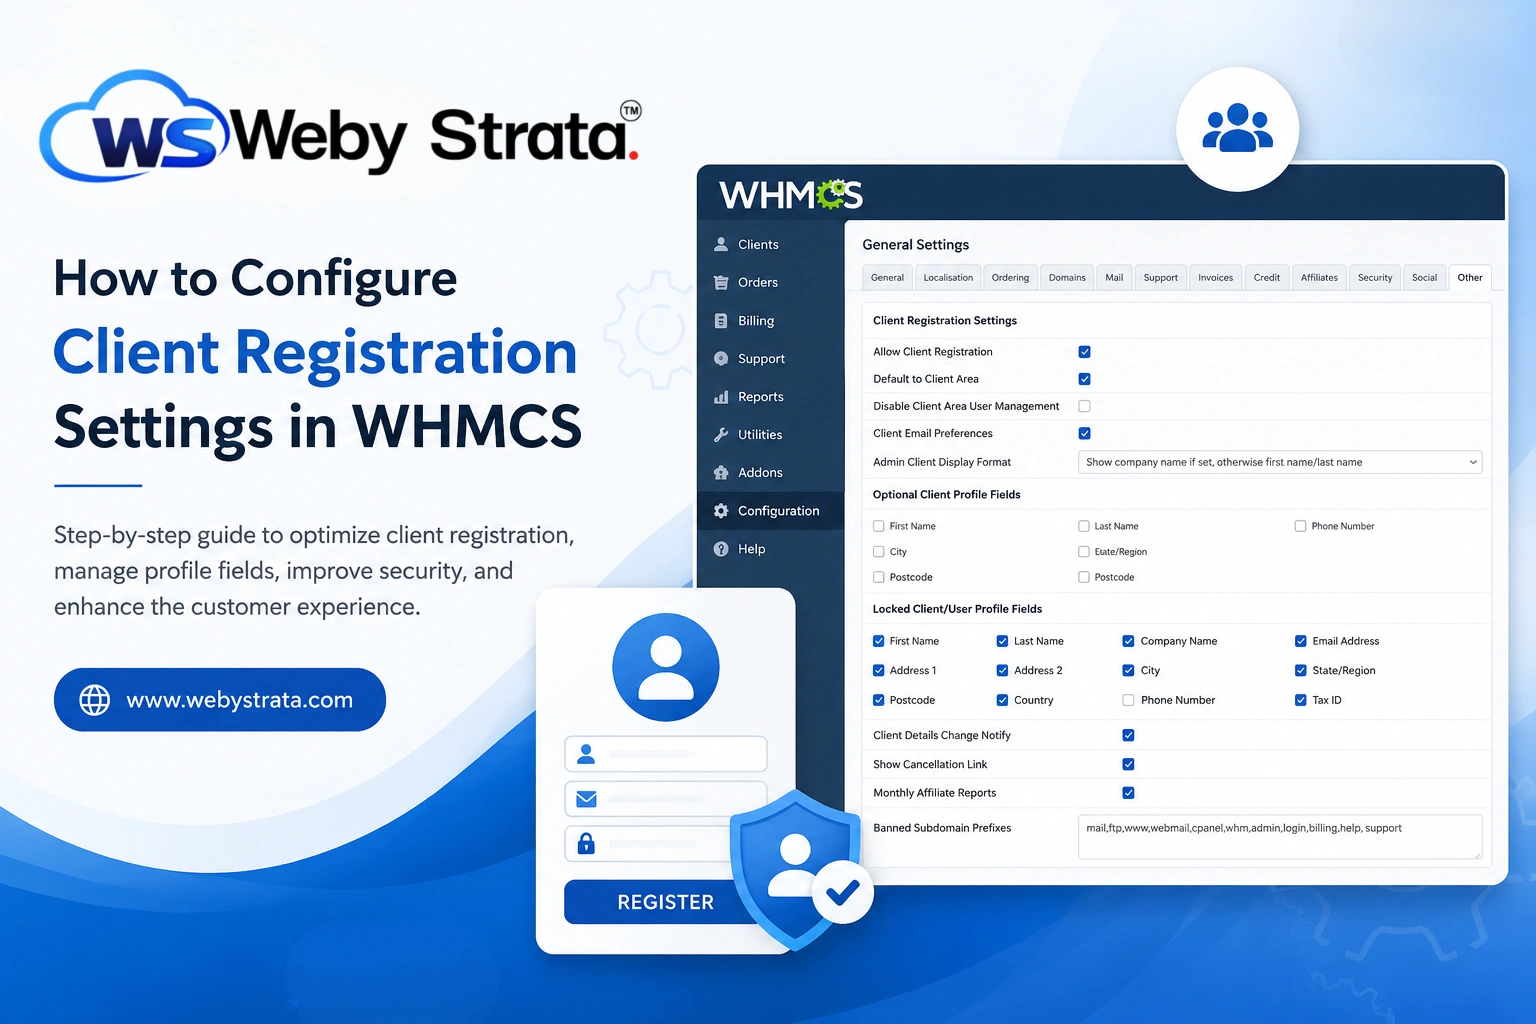
How to Configure Client Registration Settings in WHMCS
How to Configure Client Registration Settings in WHMCS Client registration is the gateway to your WHMCS billing and automation platform. Before customers can purchase hosting, register domains, submit support tickets, or manage services, they…
How to Configure Client Registration Settings in WHMCS
Client registration is the gateway to your WHMCS billing and automation platform. Before customers can purchase hosting, register domains, submit support tickets, or manage services, they must create a client account. WHMCS provides several configuration options that allow administrators to control how users register, what information they must provide, and how client profiles are managed.
Properly configuring Client Registration Settings in WHMCS helps improve user experience, reduce fraudulent signups, maintain accurate client records, and simplify account management. Whether you run a web hosting company, SaaS platform, domain registration business, or digital agency, these settings play a critical role in customer onboarding.
In this guide, we’ll walk through each available Client Registration Setting in WHMCS and explain how to configure it effectively.
What Are Client Registration Settings in WHMCS?
Client Registration Settings in WHMCS control how customers create and manage their accounts. These settings determine:
- Whether users can register without placing an order
- Which profile fields are required
- How client names are displayed
- Whether users can edit profile information
- Client email preference management
- Administrative notifications for profile changes
- Client area behavior and account management options
These settings help ensure a smooth registration experience while maintaining security and data accuracy.
Why Configure Client Registration Settings?
Configuring Client Registration Settings in WHMCS offers several benefits:
- Improved User Experience
- Better Data Accuracy
- Enhanced Security
- Reduced Administrative Work
- Flexible Registration Process
How to Access Client Registration Settings
Follow these steps to access the Client Registration Settings page.
Step 1: Log in to WHMCS Admin Area
Log in to your WHMCS administrator dashboard.

Step 2: Navigate to General Settings
Go to:
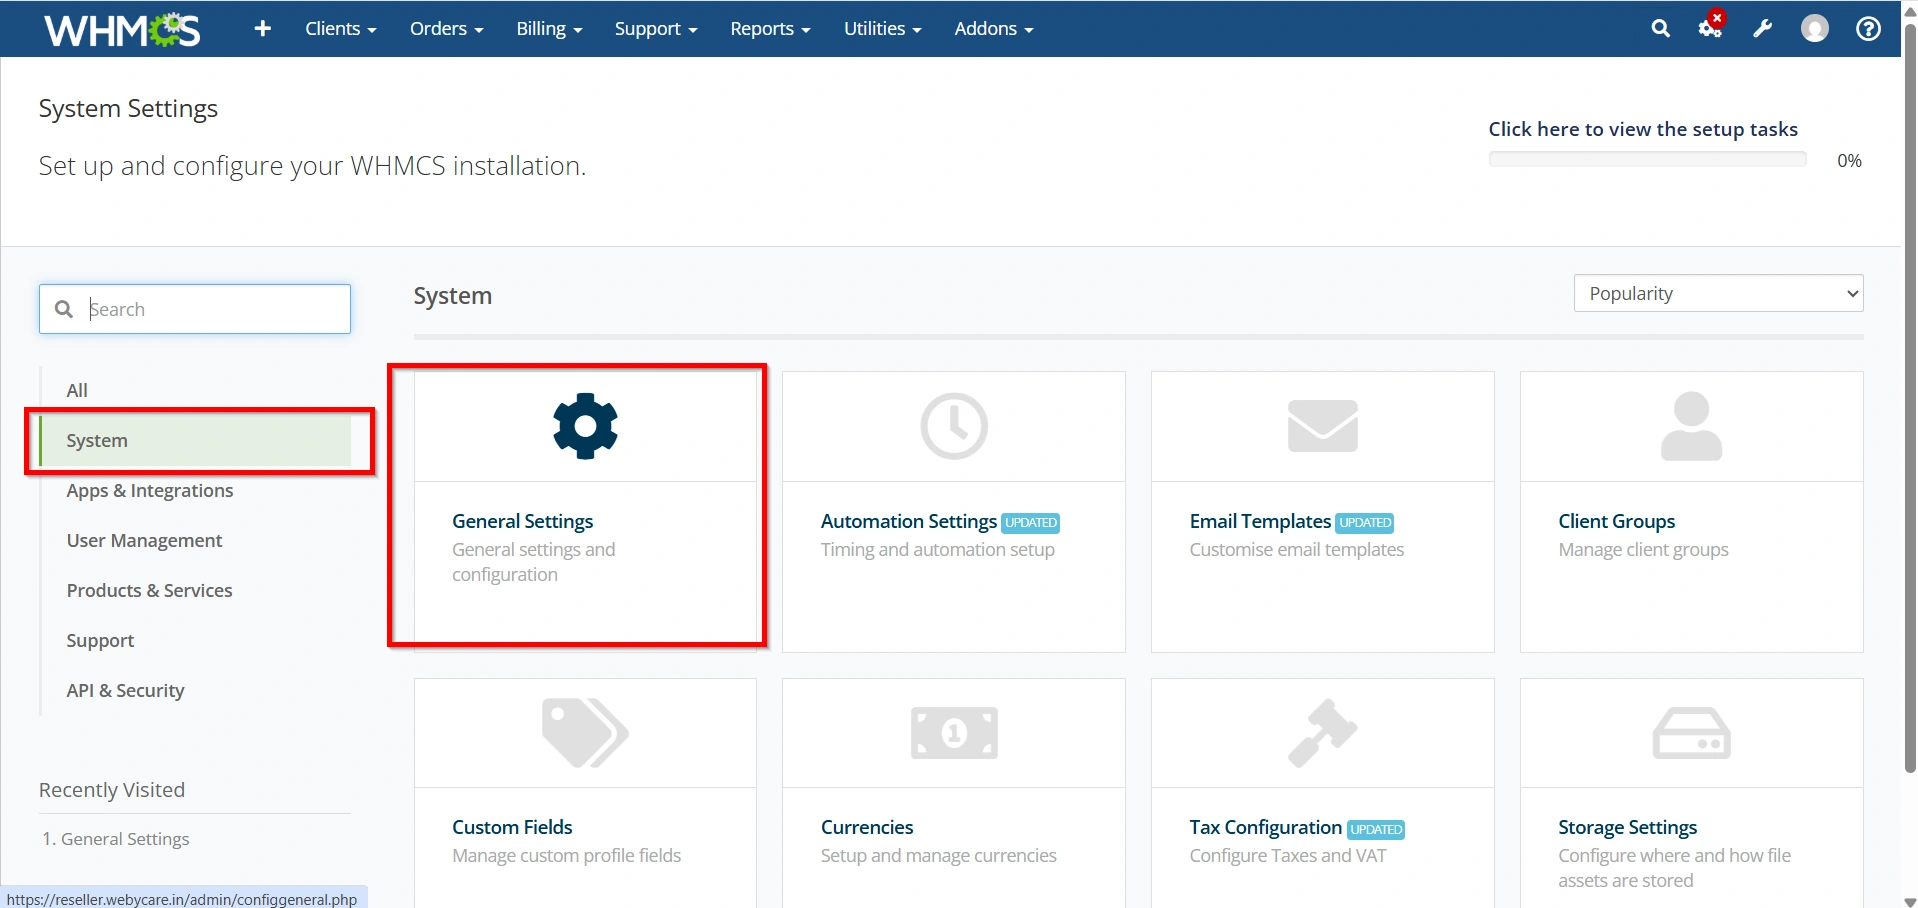
- Configuration Icon → System Settings
![]()
- System → General Settings
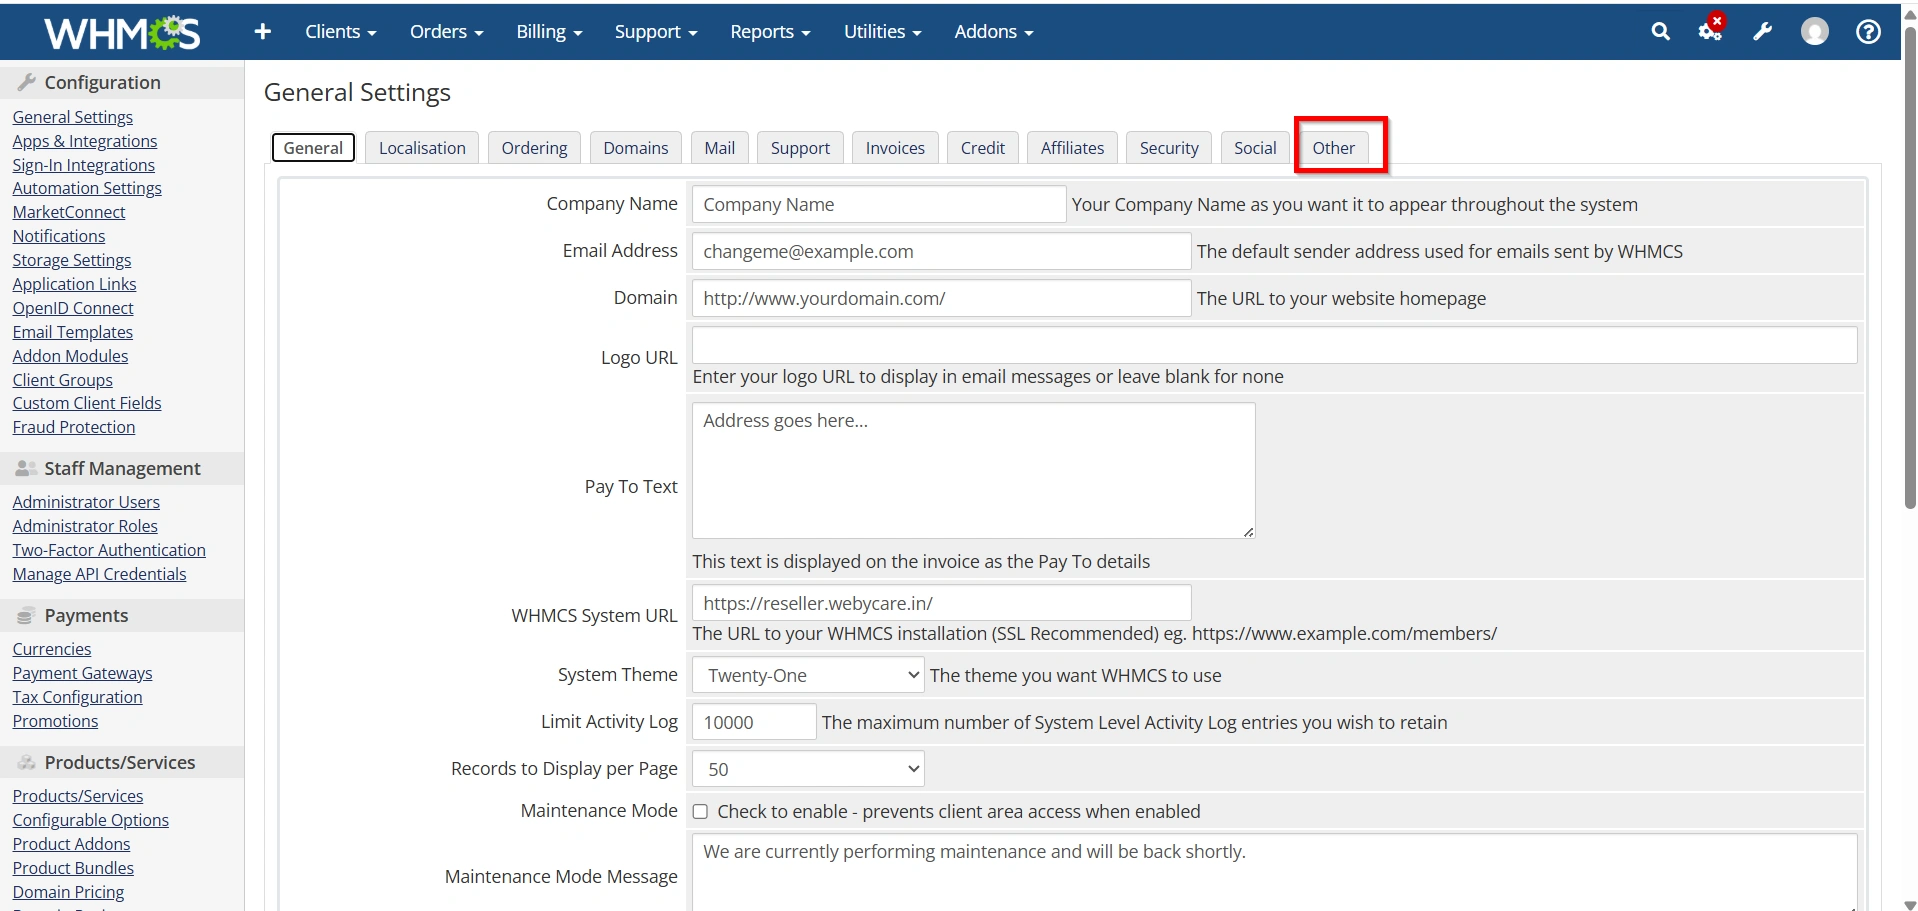
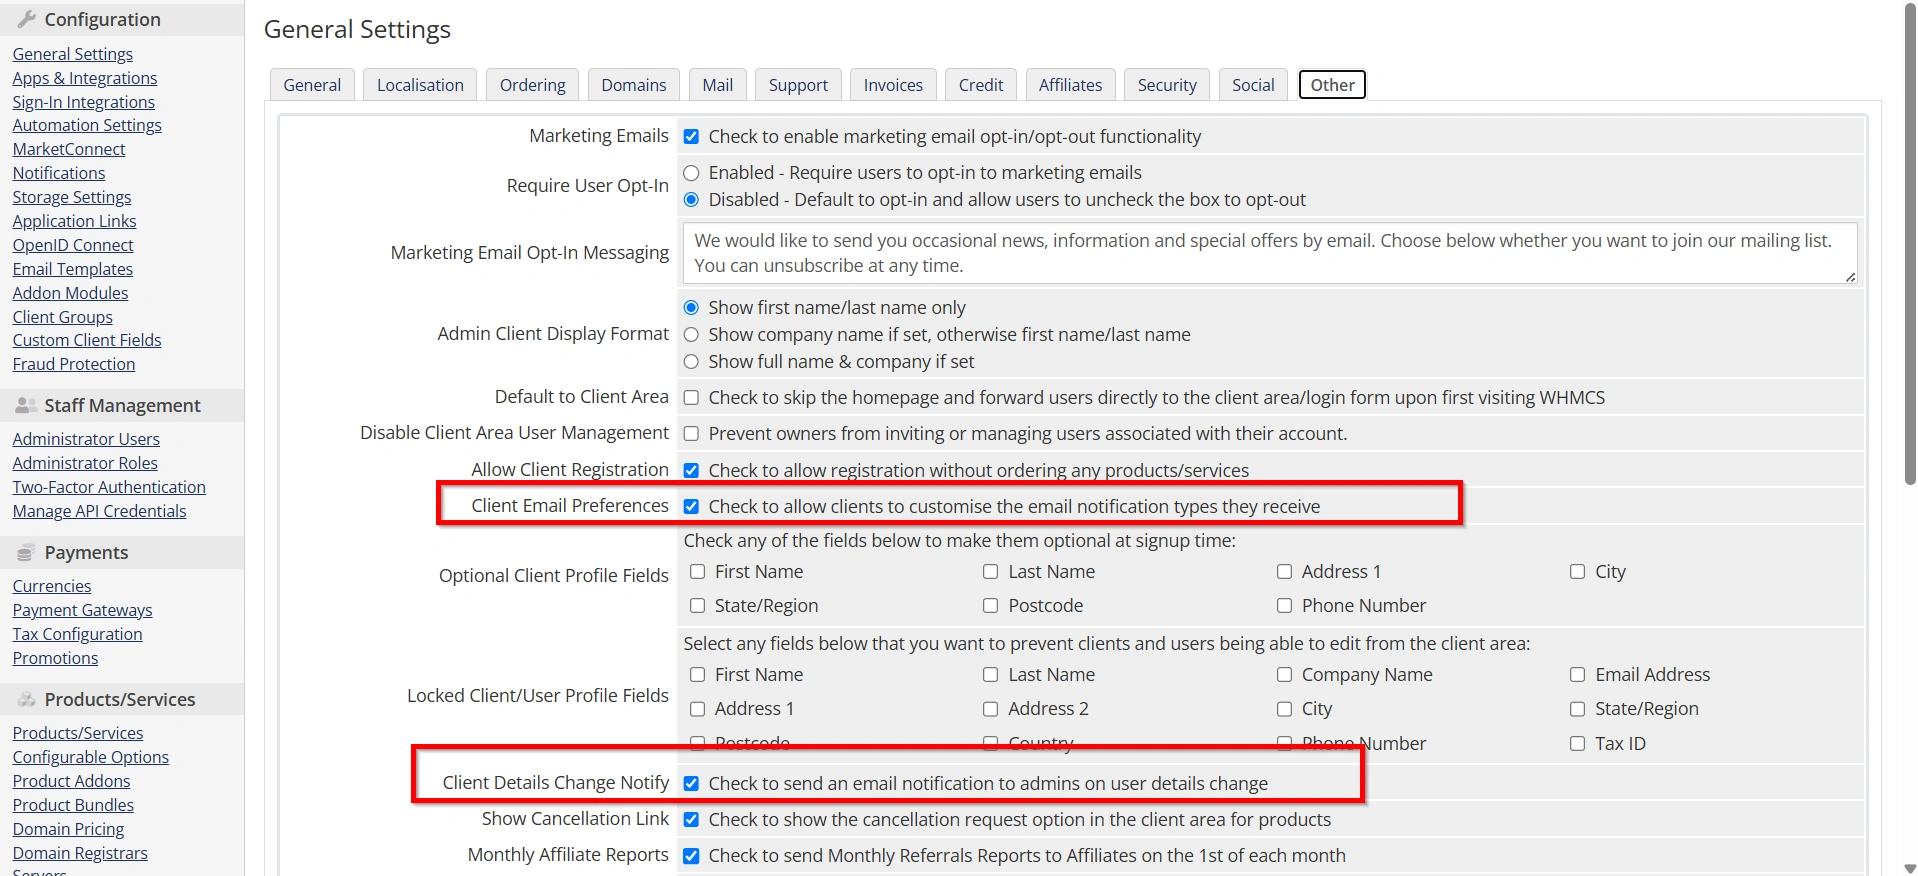
Step 3: Open the Other Tab
Click the Other tab.
Here you’ll find the client registration and profile management settings.
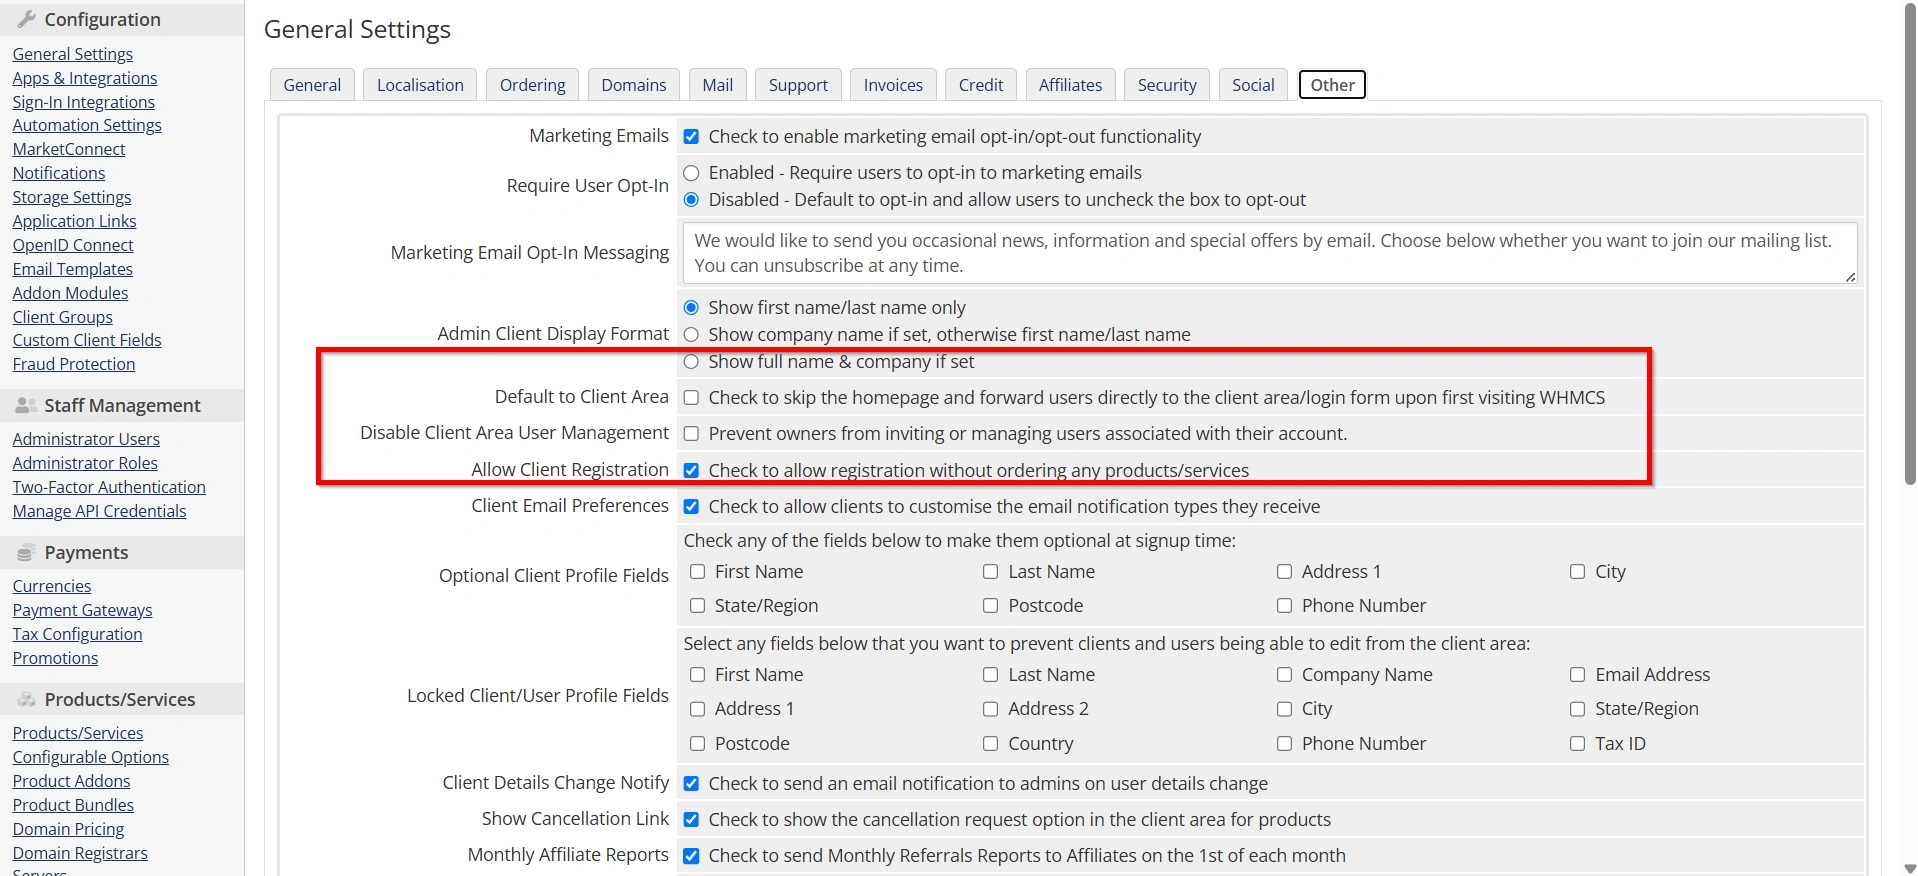
Step 4: Configure Registration and Client Area Access
WHMCS provides several settings that control how clients register and access their accounts.
Allow Client Registration
Enable this option to allow visitors to create an account without placing an order.
Benefits include:
- Faster onboarding
- Support-only account creation
- Improved customer convenience
Default to Client Area
When enabled, visitors are redirected directly to the WHMCS client area or login page instead of the homepage.
Benefits include:
- Simplified navigation
- Faster account access
- Better user experience for existing customers
Disable Client Area User Management
This option prevents account owners from inviting additional users or managing account permissions.
Enable this setting if you prefer administrators to have full control over account access.
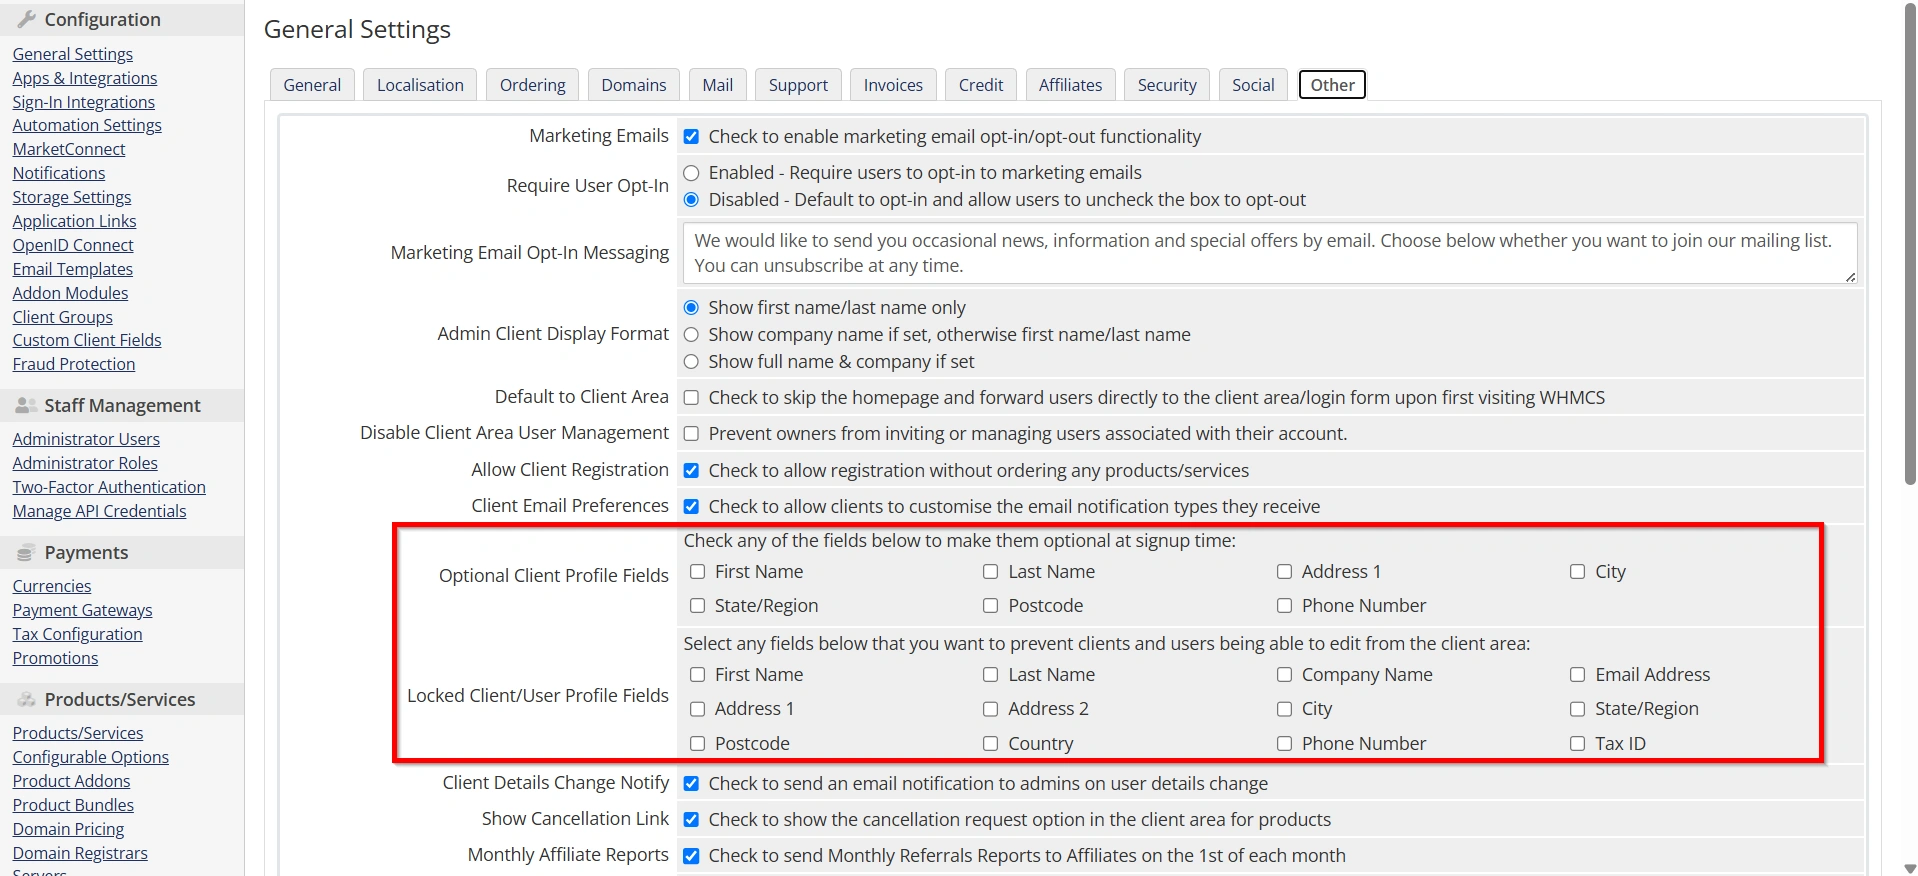
Step 5: Configure Client Profile Fields
WHMCS allows administrators to control which information clients provide and manage.
Optional Client Profile Fields
You can make the following fields optional during registration:
- First Name
- Last Name
- Address 1
- City
- State/Region
- Postcode
- Phone Number
Reducing required fields can improve registration completion rates.
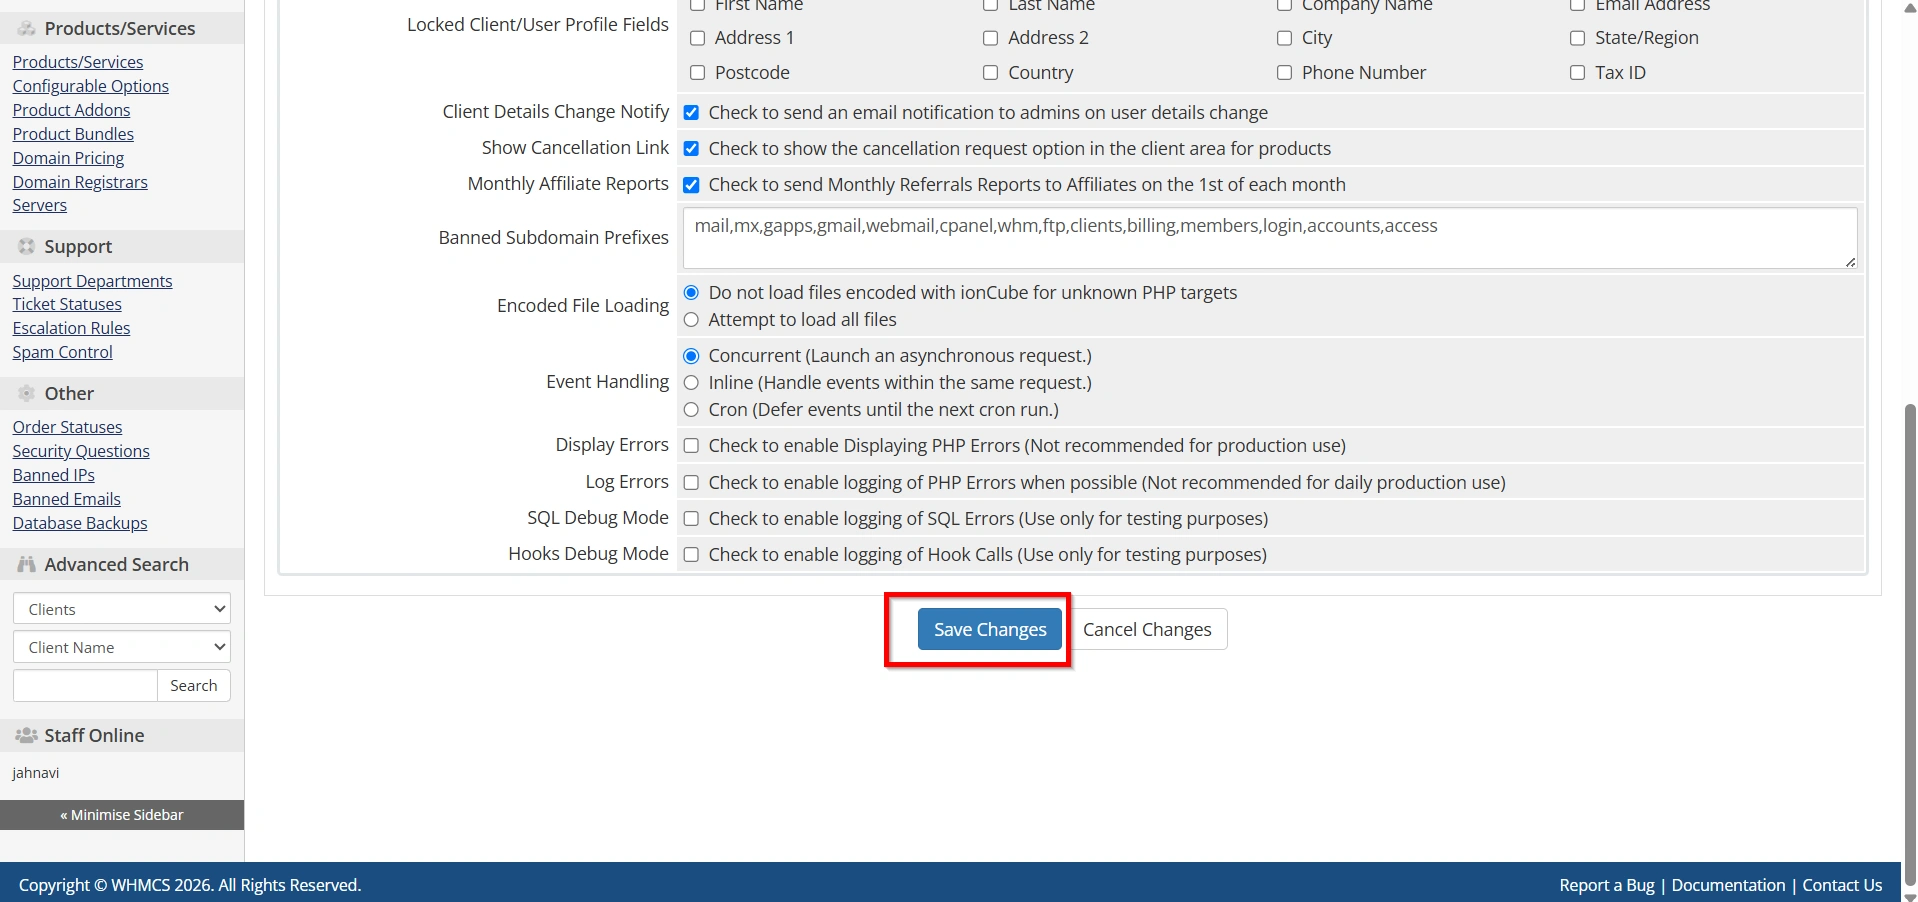
Locked Client/User Profile Fields
You can prevent clients from editing specific profile details, including:
- Name
- Company Name
- Email Address
- Country
- Phone Number
- Tax ID
Locking important fields helps maintain accurate billing and compliance information.
Step 6: Configure Client Communication Preferences
These settings control how clients receive notifications and how administrators are informed of profile changes.
Client Email Preferences
Allows clients to customize which email notifications they receive.
Examples include:
- Invoice reminders
- Support updates
- Domain notifications
- Marketing emails
Client Details Change Notify
When enabled, administrators receive an email whenever a client updates their profile information.
Benefits include:
- Better account monitoring
- Fraud prevention
- Improved administrative oversight
Step 7: Configure Cancellation and Affiliate Options
WHMCS includes settings for service cancellations and affiliate reporting.
Show Cancellation Link
Displays a cancellation request option within the client area.
Benefits include:
- Easier cancellation management
- Improved customer experience
- Better record keeping
Monthly Affiliate Reports
Automatically sends referral and earnings reports to affiliates on the first day of each month.
This helps affiliates track their performance and earnings.

Step 8: Configure Banned Subdomain Prefixes
The Banned Subdomain Prefixes setting prevents customers from using reserved names when creating subdomains.
Common examples include:
- ftp
- webmail
- cpanel
- whm
- admin
- login
- billing
Using banned prefixes helps avoid conflicts with system services and control panel functions.

Related Articles