cPanel
How to Update Contact Information In cPanel?
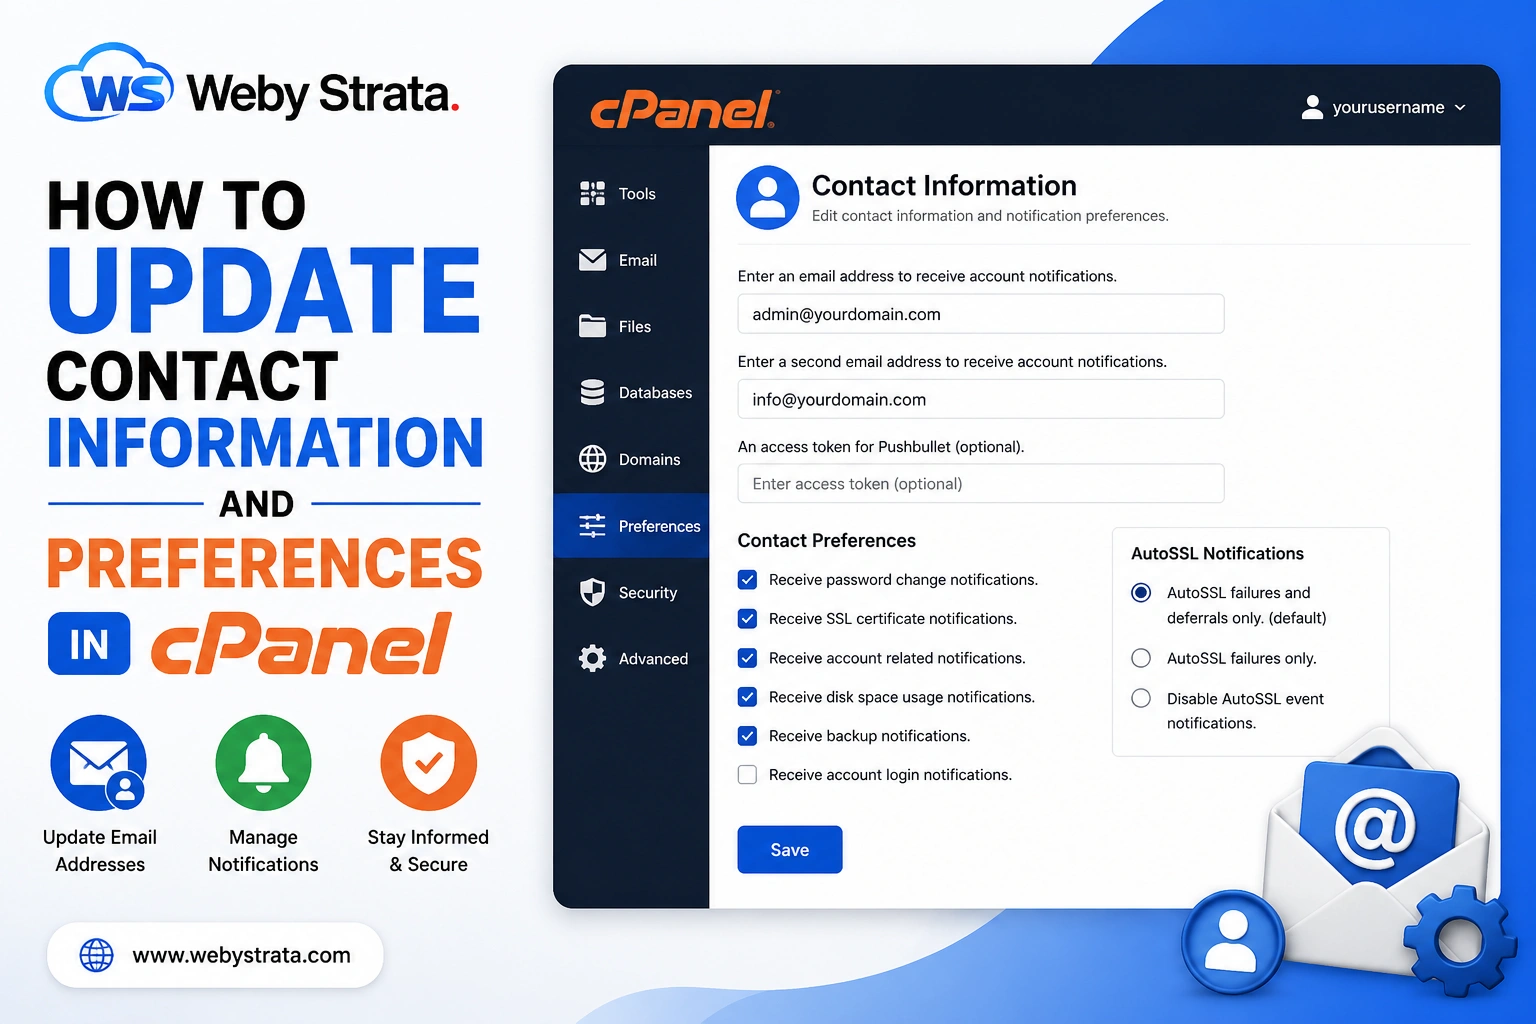
How to Update Contact Information in cPanel Sometimes you may need to update the contact information and notification preferences for your hosting account. Usually, users contact their hosting provider for this task, but if…
How to Update Contact Information in cPanel
Sometimes you may need to update the contact information and notification preferences for your hosting account. Usually, users contact their hosting provider for this task, but if you are using cPanel hosting, you can easily update it yourself within a few clicks.
Updating your contact information is important because cPanel uses this email address to send:
- Password reset notifications
- Security alerts
- SSL certificate warnings
- Disk space notifications
- Backup alerts
- Hosting account updates
In this tutorial, we will show you how to update contact information and preferences in cPanel step by step
Step 1: Login to Your cPanel Account
First, login to your cPanel account
Step 2: Open Contact Information
Once you are inside cPanel:
- Go to the Preferences section
- Click on Contact Information
Here, you will be able to update your contact details and notification preferences.

Step 3: Update Primary Contact Email Address
Inside the Contact Information page, you will see a field called:
“Enter an email address to receive account notifications”
Enter your active email address in this field.
This email address will receive important hosting notifications related to your account and server.
Add a Secondary Email Address
You can also add a second email address for backup notifications.
Locate the field:
“Enter a second email address to receive account notifications”
Enter your secondary email address if required.

Step 4: You may also notice an option called
“An access token for Pushbullet”
This option allows you to receive cPanel notifications using the Pushbullet service.
If you do not use Pushbullet, you can leave this field blank.

Step 5: Configure Contact Preferences
Under the Contact Preferences section, you can choose which notifications you want to receive from cPanel.
These notifications may include:
- Password change alerts
- SSL certificate warnings
- Disk usage notifications
- Account login alerts
- Backup notifications
- Server-related warnings
Enable the notifications that are important for monitoring your hosting account.

Under AutoSSL Notifications, you can choose how you want to receive SSL-related alerts.
Available options include:
If you select this option, you will receive notifications only when:
-
AutoSSL failures only
If selected, you will receive notifications only when AutoSSL certificate requests fail.
- AutoSSL failures and deferrals only. (default): If you select this option, you will get notified only for AutoSSL certificate request failures, warnings, and deferrals.
-
Disable AutoSSL event notifications
If selected, all AutoSSL notifications will be disabled.
Step 6: Save the Changes
After updating your contact information and preferences, click on the Save button.
Your new settings will now be applied to your hosting account.You should see a success message confirming the changes.

Related Articles